Follow my blog with Bloglovin

Tagged: Cake

Lesson 12: Entremets Passionata | Raspberry & Passionfruit

Salut!

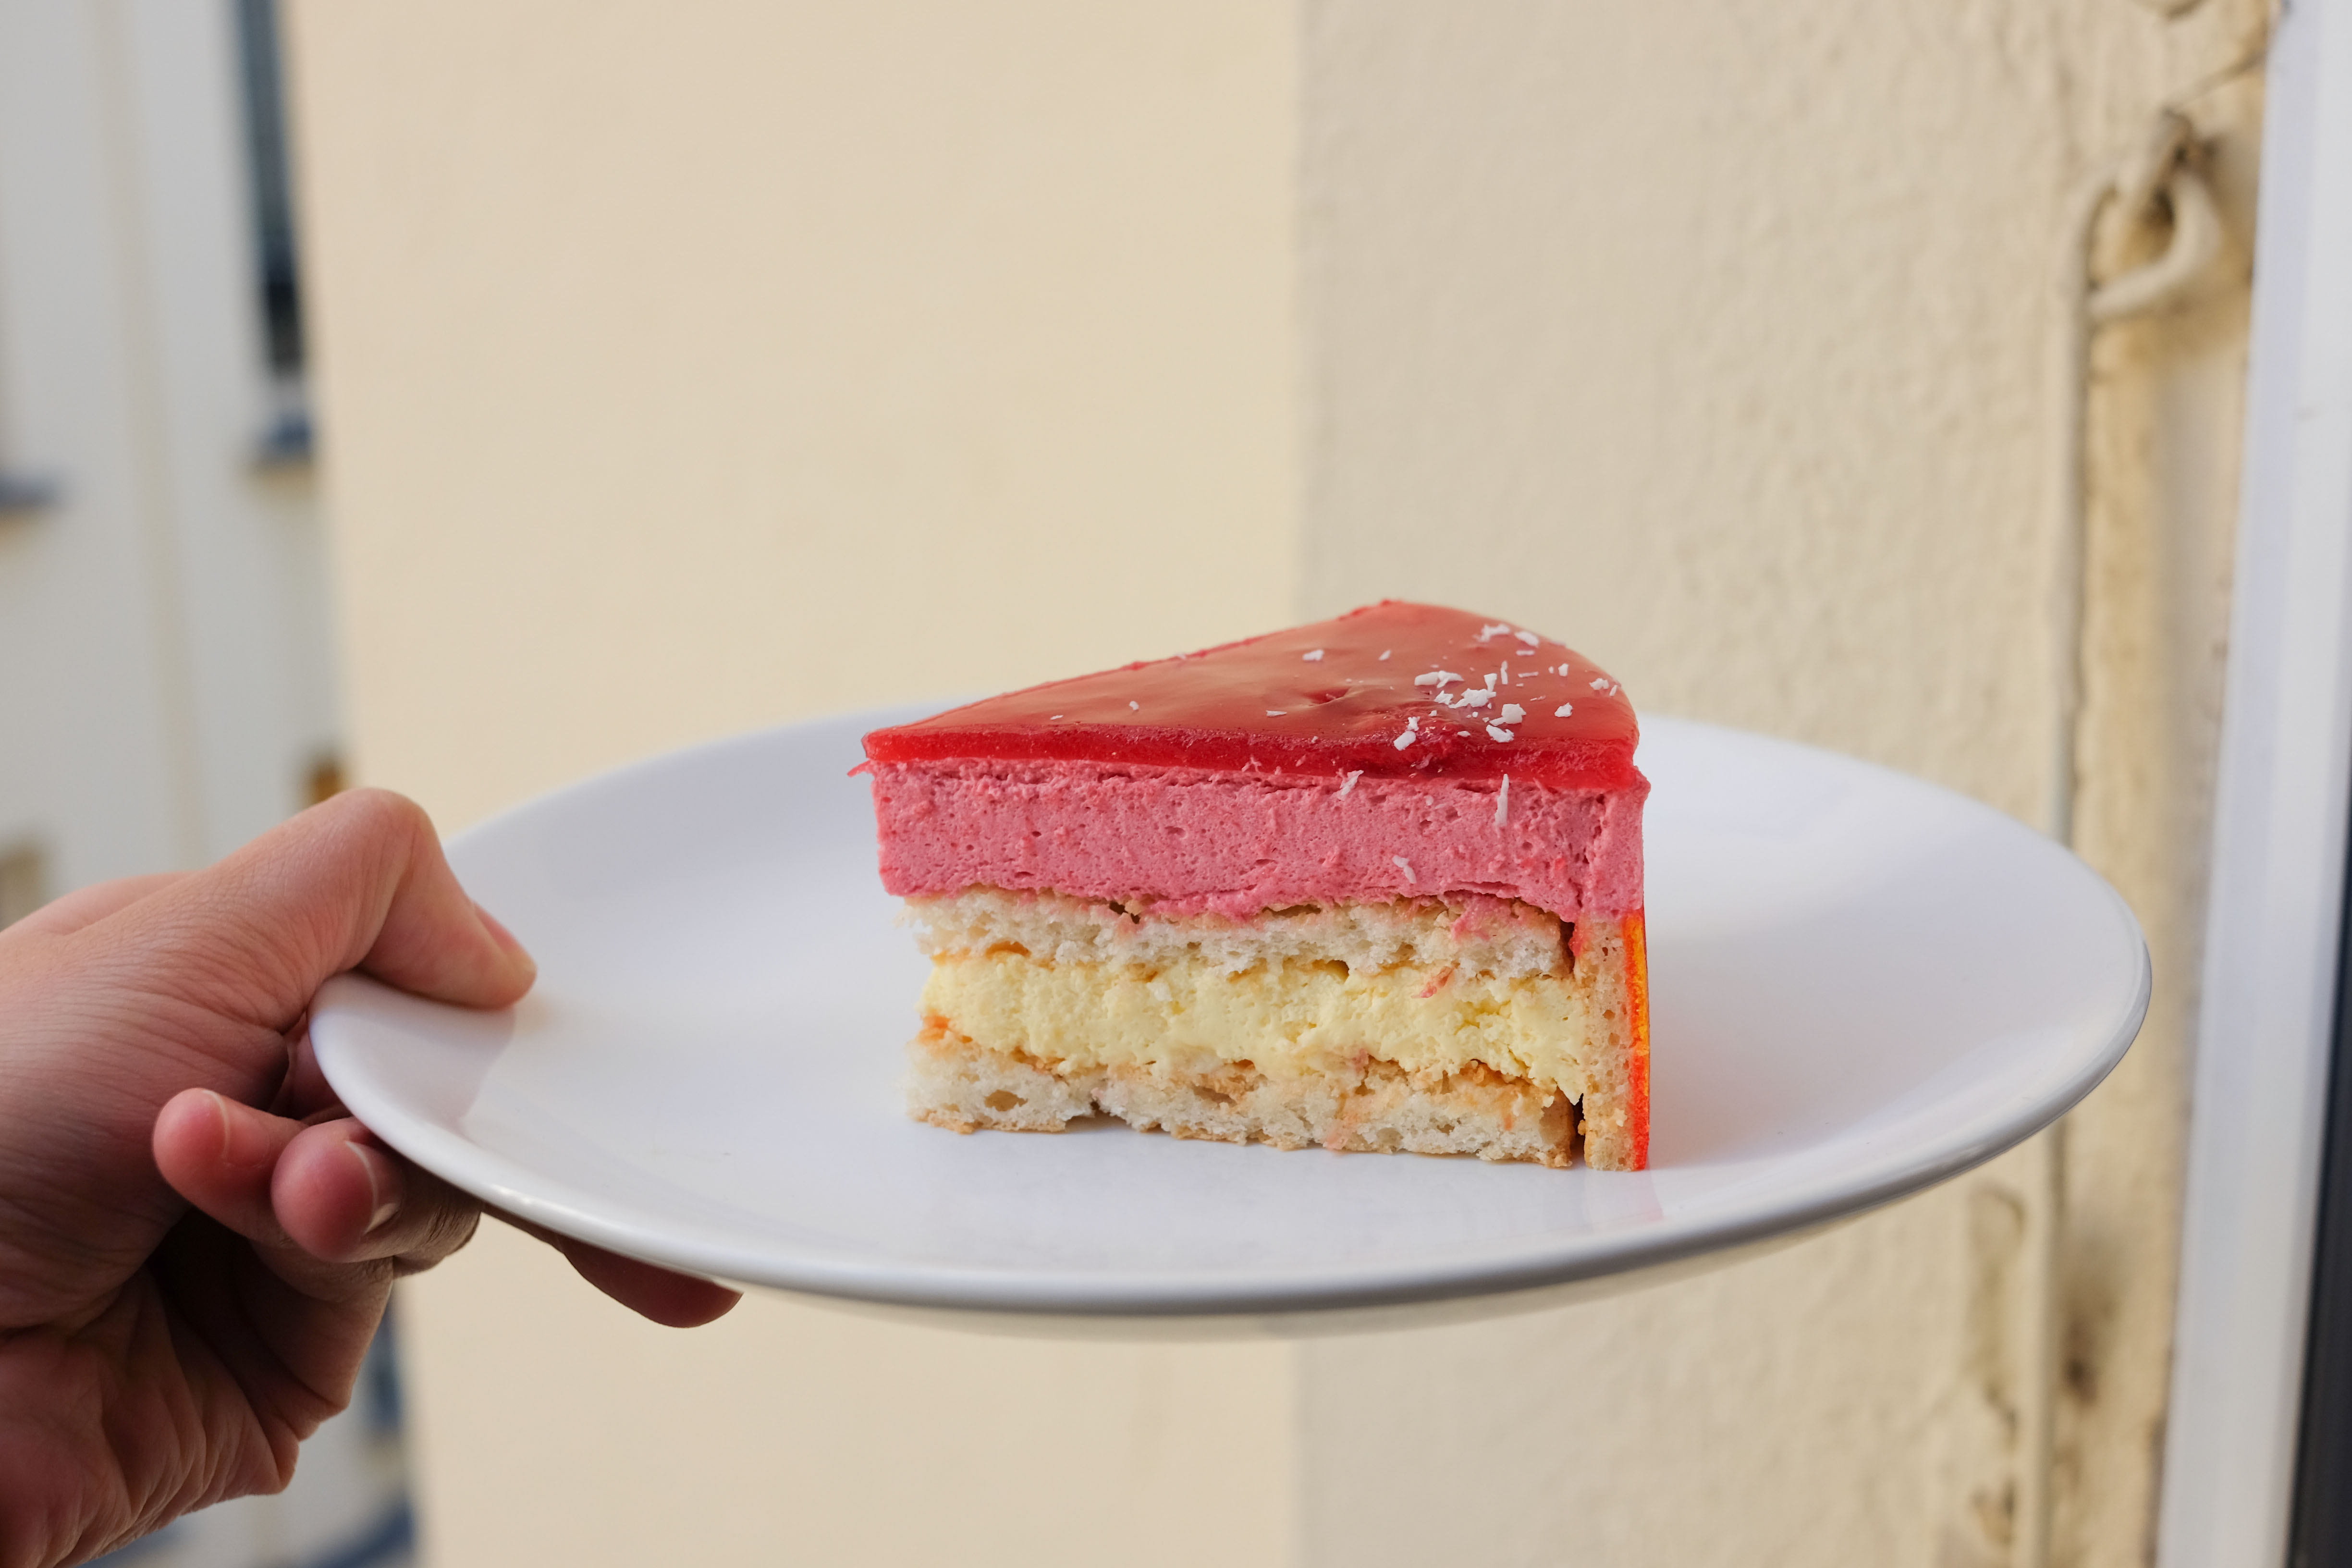
So we finally took a break from chocolate with this week’s cake – a lovely raspberry & passionfruit entremet. Even though I was really glad to get a break from chocolate for a while, I was wondering why this recipe had the exact same flavours as that of the tart we did in lesson 3. I guess passionfruit & raspberry pair well together?

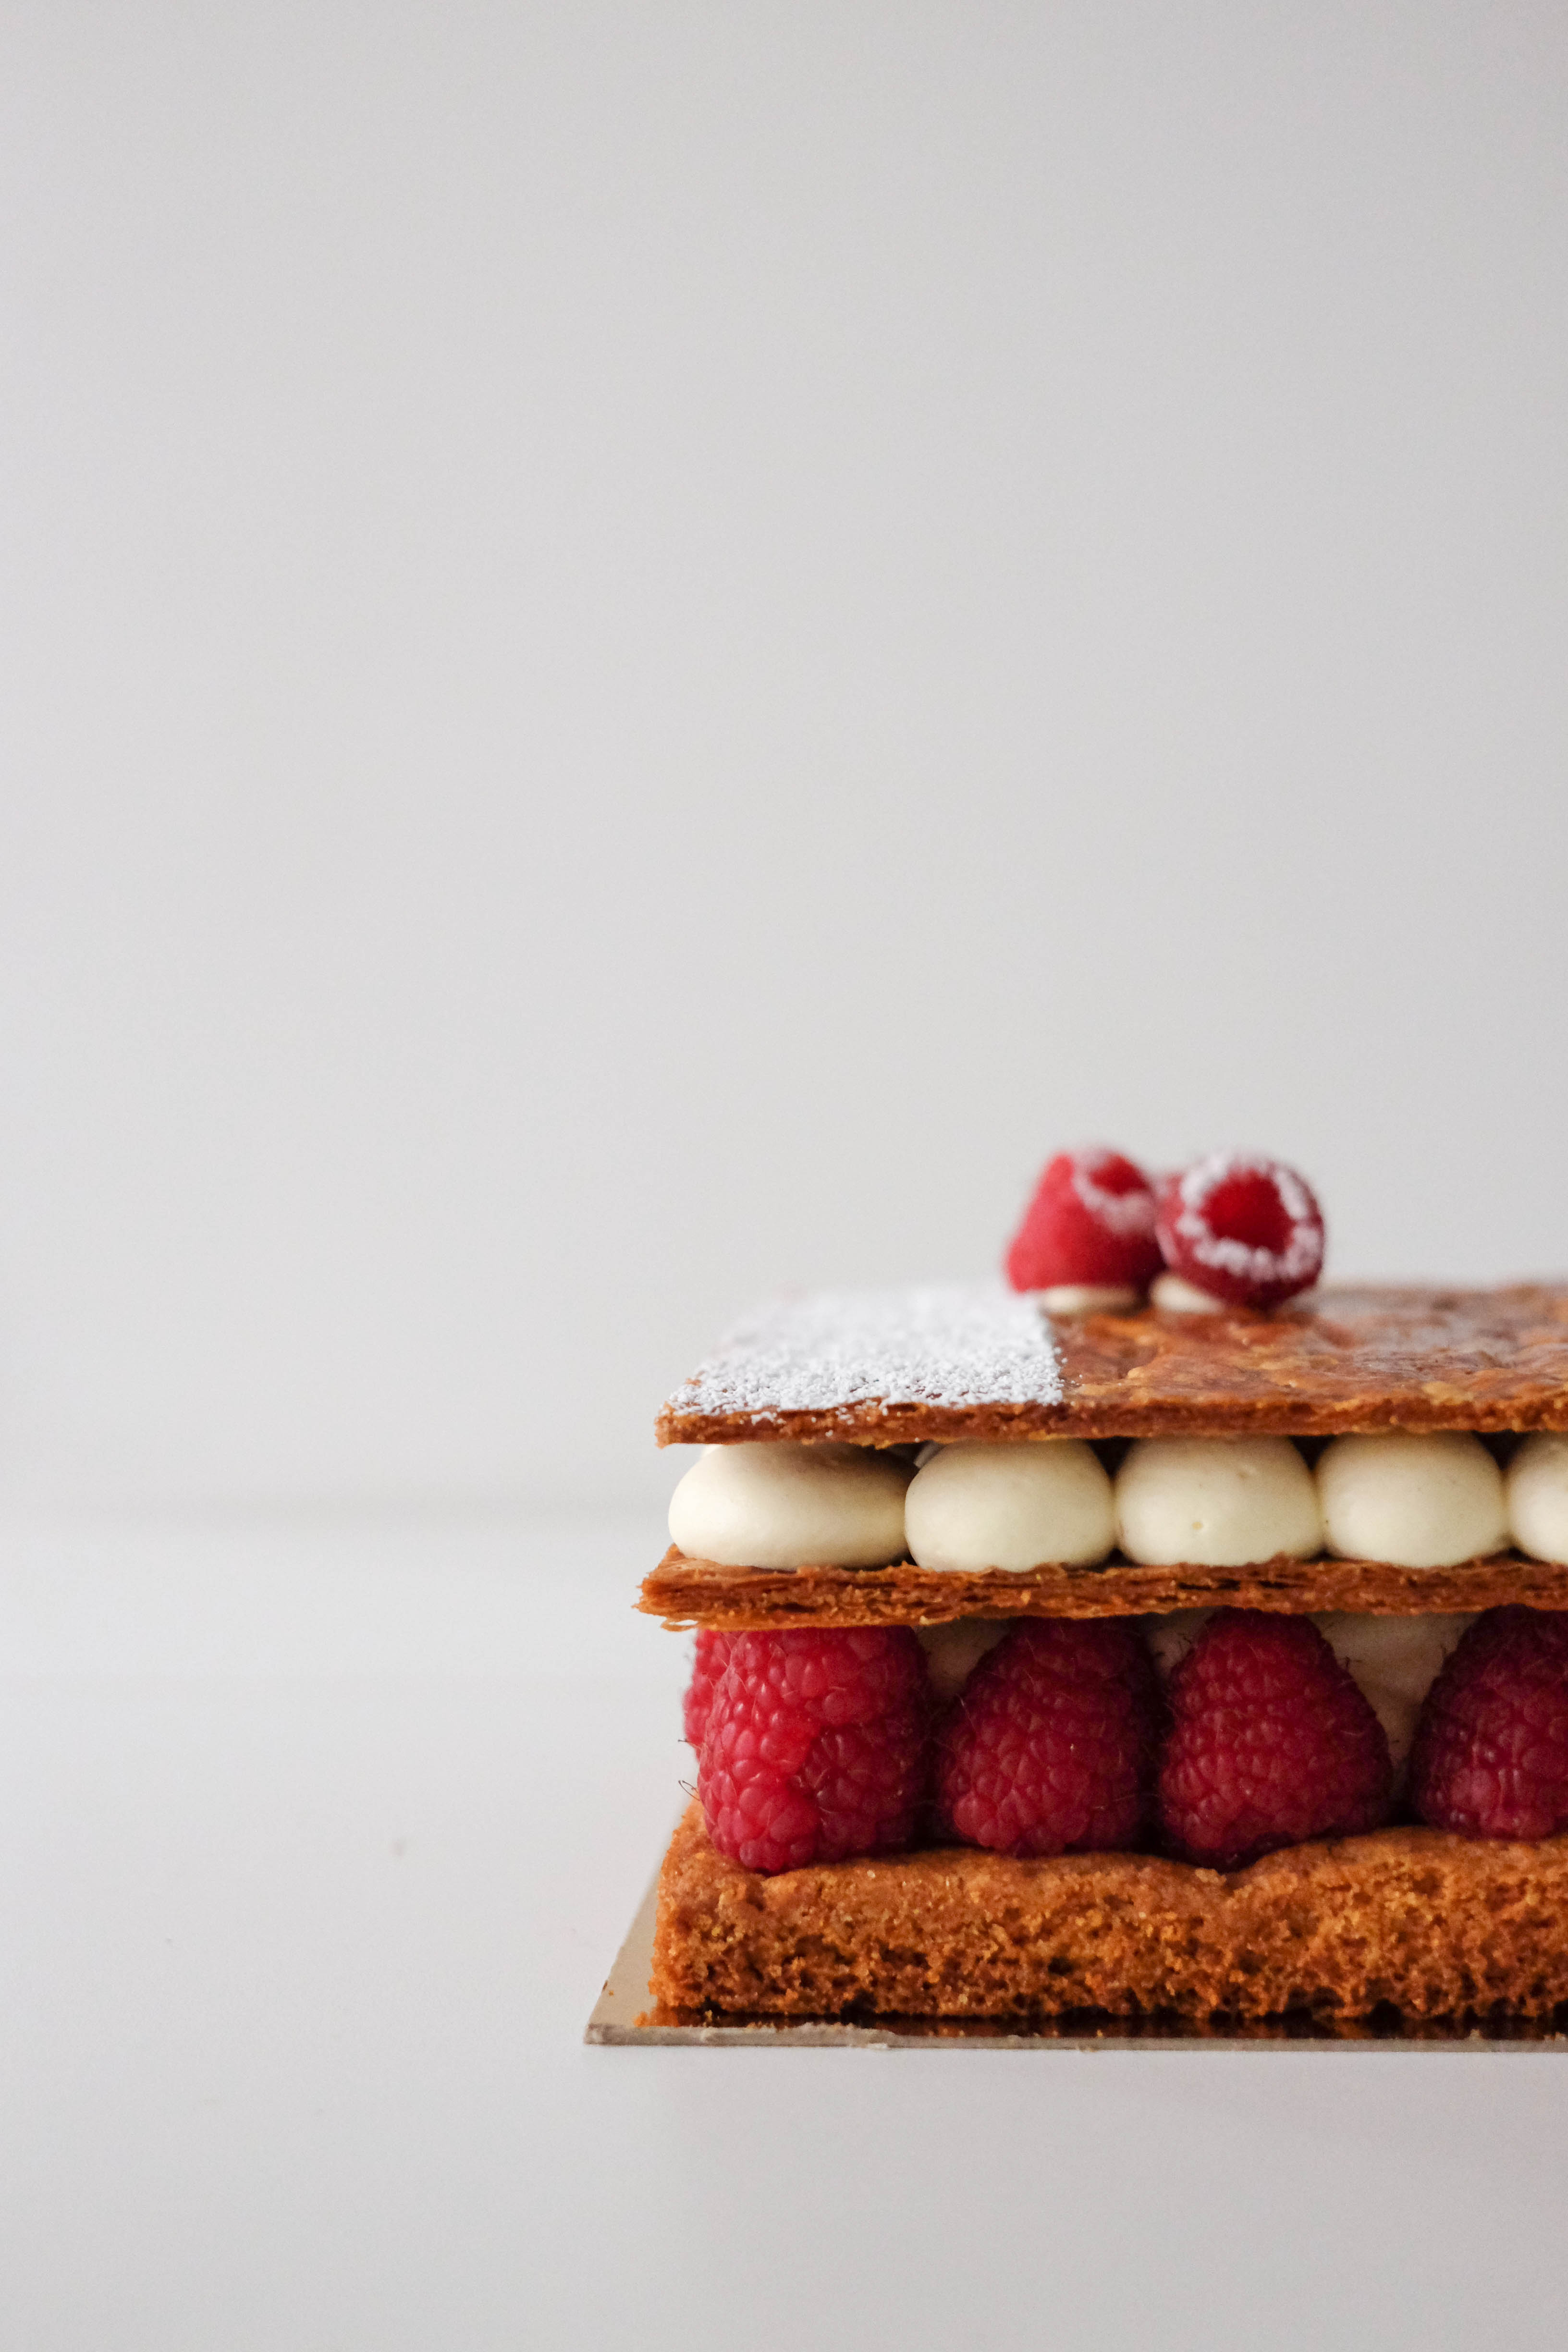
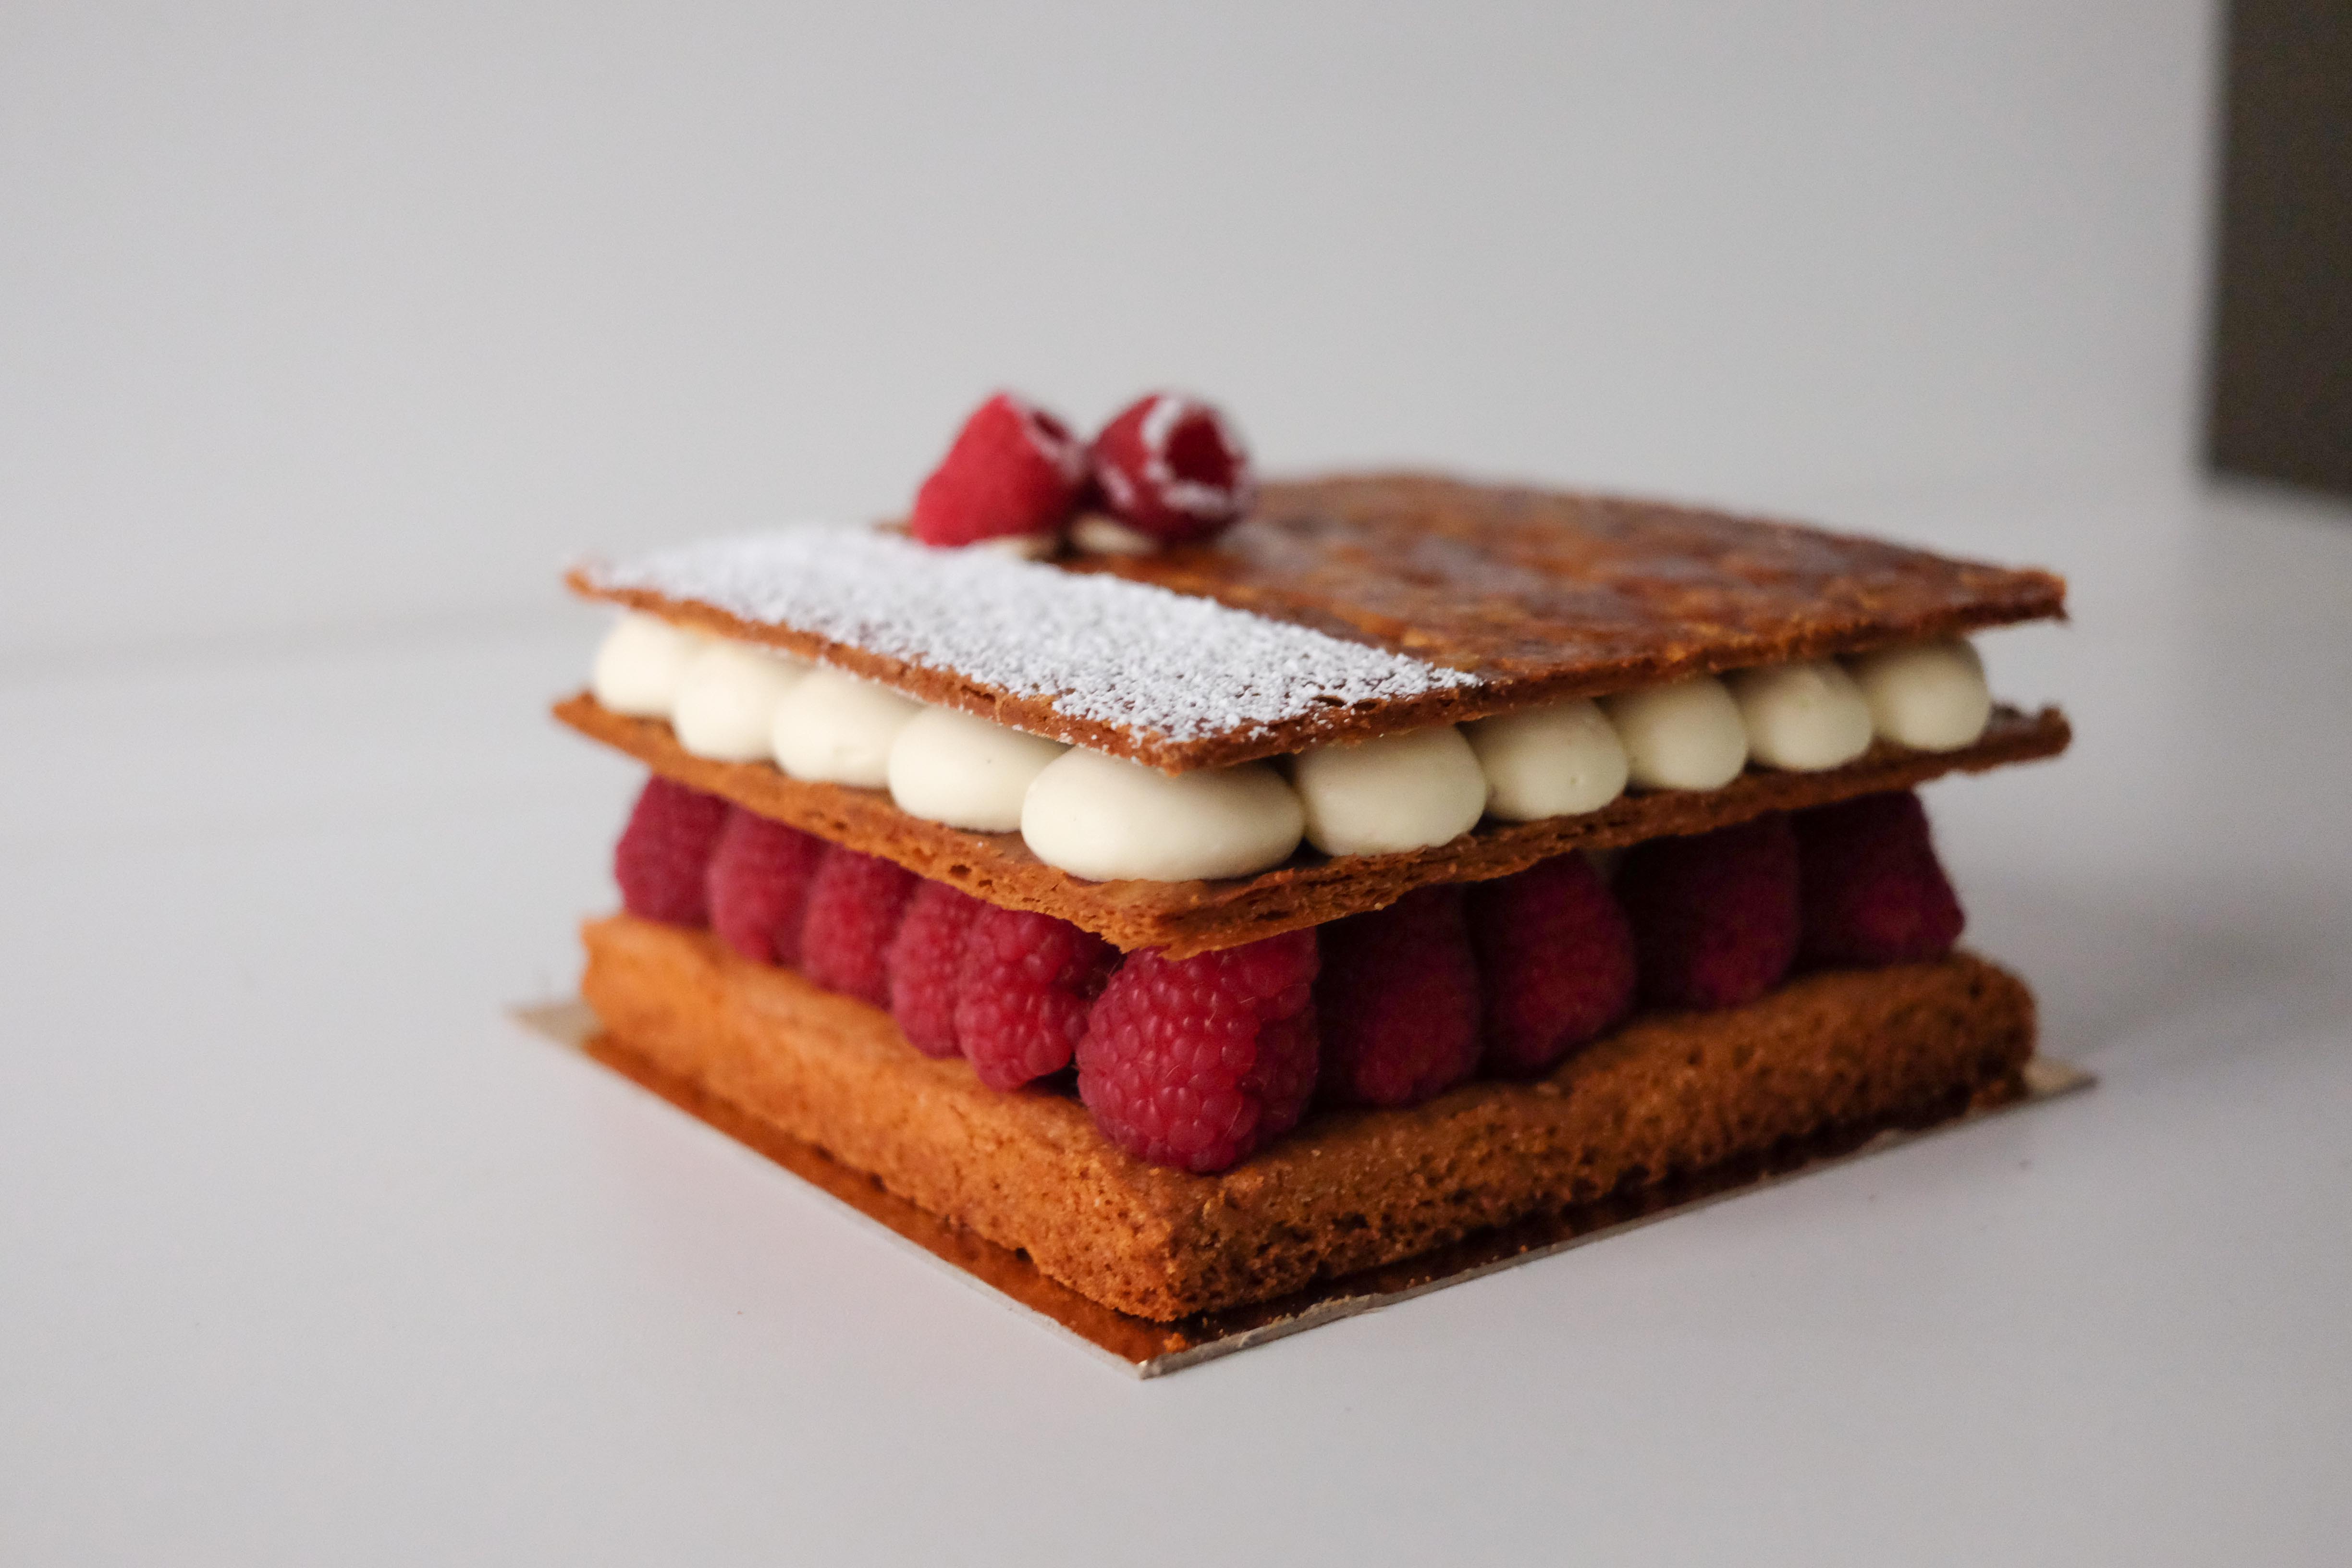
Anyhoo, this cake is made up of a passionfruit cream, a raspberry mousse, coconut dacquoise biscuit, wrapped with a tie-dyed joconde biscuit & topped with raspberry gelee. The coconut dacquoise is probably my favourite dacquoise thus far. Yum yum in my tum tum!

We had Chef Verger for this practical again. It was nice to have to practice speaking French even though my French is really really bad haha. Shoutout to Charlie from Street French who I’ve been having classes with – really helped me with understanding what Chef was saying in prac + in communicating with him.

We had to work in pairs AND fours for this practical. Because we only need a 2-inch strip of tie-dyed joconde around the cake, one sheet was shared between four people. Mardi, Youjeong, Jianhua & I did this together, with Jianhua & I taking charge of the coloured part of it. Thank goodness we spread it quickly enough and we managed to retain colour differences (rather than everything combining together to be an orangey hue). This cake was definitely wayyy more manageable than last week’s *phew*.

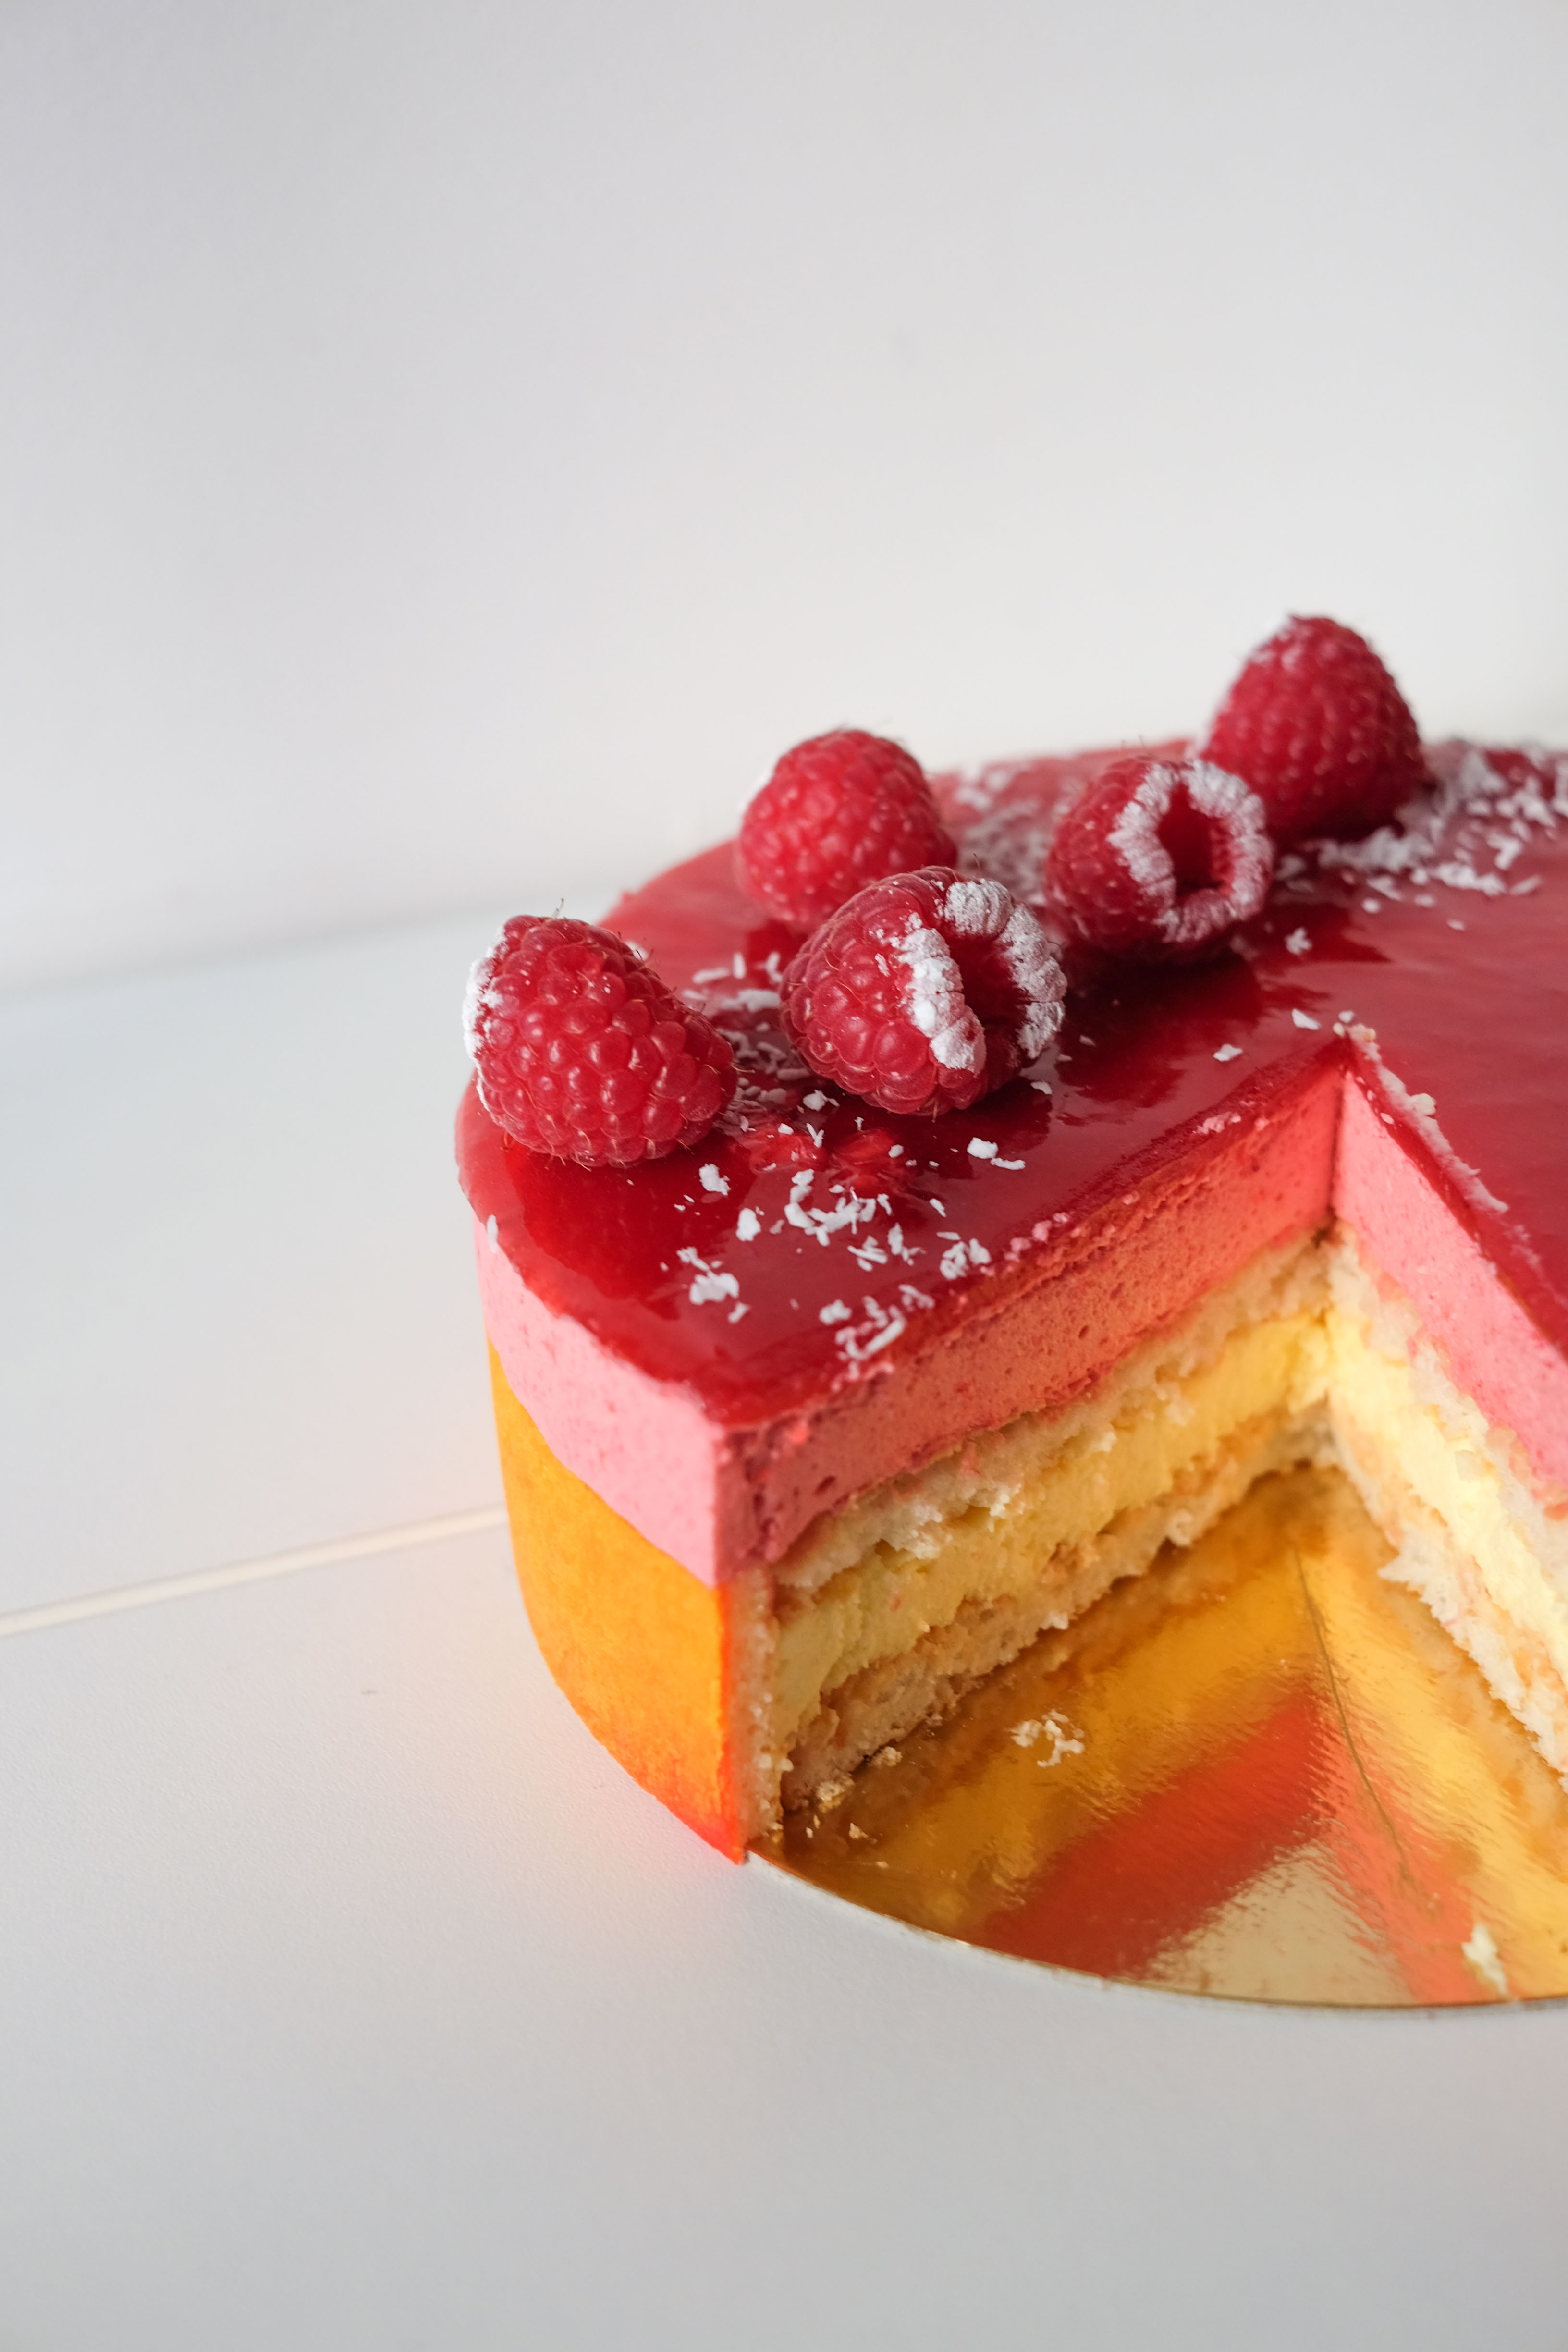
Really love this cake – think I’ll attempt it again sometime when I’m home 🙂 Perhaps it’s because I love raspberry & passionfruit (I guess answering my question on why the school is repeating this pairing of flavours haha). To those who are back home, I’ll post it on Instag if I do!

Also, the sun is out more and we’re having much better weather. Super super happy bout that.

Got a huge backlog of posts to go though (this is supposed to be an end-Feb post haha) so stay tuned!!!

xx,
Eug

More

Lesson 2: Mille Feuille

DSCF5942

Hi everyone~

So class started this week on Tuesday, meaning that I had a long weekend to run more errands (lots and lots of grocery shopping) and settle in. It was really chilly the whole weekend + week thanks to the drizzling and wind 🙁

For the second demonstration, the chef showed us the mille feuille & the tarte aux fruit rouges. I really liked this demo cause of the lovely colours of the desserts (lots of red!). In our first practical (and in chef’s first demo), we had to save about 250g of inverted puff pastry to be used for our mille feuille in the second practical. I like how there was this nice transition from the first to the second class.

For every class, we have 4 people that are assigned to be team leaders. This was my week to be assigned & I was kinda nervous about it cos being a team leader means getting stuff for people (and I felt like I was going to be a burden since I’m still not the most familiar with the kitchen). Thankfully, the other 3 were super efficient & could guide me on what to do.

We got Chef Soyoun for this practical. She’s super impressive, speaking Korean, French & English all fluently (she might speak even more but these are the 3 she uses in class). This was my first time in a practical with her given that she wasn’t in the Paris campus back in 2013, but I must say that I really liked the practical with her 🙂

Overall, I was extremely pleased with how my Mille Feuille turned out – dry butter & good weather works wonders! The lighting on the day of practical was also favourable for me to take some good pictures heh. Had dinner with Julie & Isabelle (exchange friends) that night and brought Mille Feuille along. Glad that the cake didn’t go to waste & that I got a stamp of approval from two Parisians 😀

DSCF5937

Really enjoying the Intermediate syllabus so far & very happy bout meeting new people.

Till the next post!

xx,
Eugenia

P.S. Pardon the slightly weird focus of my photos – still getting used to my new camera (Fujifilm XT-10, with 27mm pancake lens)

More

Gula Melaka Chiffon Cake

Hi everyone!!!

My goodness – it’s been more than SIX months since I last updated. First things first, huge apologies for the major delay – I was just so overwhelmed this semester (competitions, school, sister’s wedding…) and didn’t have any time to bake at all.

Well it’s December, everyone’s favourite time of the year (well mine at least heh), and I finally managed to dig out some time to whip up something.

DSC_0451

I think I’ve mentioned somewhere before how much I love Gula Melaka. Well, when I saw a friend of mine bake a Gula Melaka chiffon cake a few months back, I just knew I’d have to try one for myself! As usual, my chiffon pan is a little too big for the normal chiffon cake recipe, also resulting in my cake being less sturdy than others I see out there. It’s also possibly because I don’t like to leave the cake in the oven for too long for fear of drying out the cake – I really like the cake moist heh.

I Googled a couple of recipes & found that they were all pretty much the same. They all used gula melaka, coconut milk & the usual chiffon cake ingredients. Since this was the first time I was trying it, I decided to just go with what the original recipe stated, leaving modifications for later, should I deem necessary.

The gula melaka chiffon cake turned out really awesome! It was moist, the gula melaka fragrance was there (also in large part due to the quality of the gula) and the cake was light & airy enough. I was extremely pleased with the result & so were the rest of my family members.

DSC_0455

I sprinkled some desiccated coconut on top just for aesthetic purposes, although my mom indicated she did not like the extra crunch. So it’s really up to you whether you want to add it, or make a gula melaka sauce to drizzle on top. I personally find that it’s sweet enough & that’s not necessary.

In any case, the recipe is below, should you find some time to try it as well!

P.S. This is the first time I’m baking + editing the photos + writing the post all in the same day haha. That’s how excited I am after the super long hiatus.

DSC_0460

Gula Melaka Chiffon Cake
Adapted from Baking Tai Tai

8-inch chiffon pan (I used a 10-inch cos that’s all I have)

Ingredients:

A:

  • 6 egg yolks
  • 150g gula melaka (I chopped it up finely)
  • 100ml coconut milk (I used fresh coconut milk, although most recipes use those from supermarket)
  • 38g vegetable oil (I used sunflower oil)
  • 140g plain flour
  • 1/4 tsp baking powder
  • 1/4 tsp salt

B:

  • 6 egg whites
  • 30g caster sugar
  • 1/4 tsp cream of tartar

Directions:

Preheat oven to 160 degrees C.

A:

  1. Heat gula melaka and coconut milk in a saucepan on low heat, stirring gently, until everything the gula is melted
  2. In a separate bowl, sift the flour, baking powder & salt
  3. Place 6 yolks in a medium-large mixing bowl and use a hand whisk (the manual kind) to whisk until yolks are light (just gently)
  4. Add oil to yolks and mix until combined
  5. Add gula + coconut milk mixture into the yolk mixture
  6. Add flour in batches to yolk mixture until well combined
  7. Set aside

B:

  1. Place egg whites in a mixing bowl and whip until foamy
  2. Add cream of tartar and continue to whisk until soft peaks
  3. Gently pour caster sugar in and whisk till stiff peaks

Putting it together:

  1. Using a hand whisk, fold the egg white mixture (B) into yolk mixture (A), in 3 batches
  2. Ensure everything is well incorporated but do not mix too much (do not want to deflate it cos it’s a chiffon cake) and put into chiffon cake tin
  3. Bake for 45-55 minutes
  4. Remove from oven when skewer comes out clean & invert to cool

Well that’s all! I don’t think I’ll make any major changes to the cake in the future, but if I do, I’ll be sure to update it on this space! Hope you guys enjoy this gula melaka chiffon cake as much my family & I do!

DSC_0464

Thanks for reading folks 🙂

Love,

Eugenia

More